Introduction
In this short article, we are going to explore an approach of running "shellcode" (or native code, or assembled machine code, you name it) with C#.
Yes, technically shellcode is the payload that spawns a shell when exploiting a vulnerability, but it's been regularly used as synonym for "short pieces of machine code" for while, so I'm sticking with that definition in this article (don't blame me)...
With C# being a managed .NET language, most people assume that is not possible to run native code with it. That is not true, and by using some interop functionalities provided by the .NET Framework, we can quite easily run machine code with C#. This can be useful in some situations, such as:
- Reuse an already natively compiled routine which you don't have access to the source;
- Program an optimized routine in assembly to use in your managed C# program;
- Use other languages capable of generating native binaries for codes that would be to cumbersome to program in C#, specially when requiring complex pointer arithmetic.
I should say that if you intend to use a lot of native code in your program, your best choice is still a native DLL and DllImport. It's definitely simpler, but adds a dependency. For short routines, the shellcode technique can be quite useful.
In order to demonstrate how you can achieve this, we are going to take that first example and directly rip a complete function from a compiled application and run it internally in our C# program, without decompiling or rewriting the original function in any way.
For the sake of simplicity and ease of understanding, we are going to use a simple native application that takes a string input from the user and hashes it into a 32bit number using some sort of unknown algorithm.
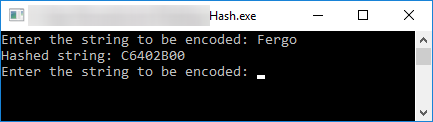
Note the resulted hash of C6402B00. We will be using that to later check if we did everything ok.
Analyzing the binary with x64dbg
Since we are taking a function from a compiled software, we need to analyze it a little bit in order to identify the code that hashes our string. I'm not going into too much detail about this step since the focus is not on how to use a debugger/disassembler neither assembly language itself. There are multiple resources in this website that covers reverse engineering and the use of a disassembler.

By looking at the listing generated by x64dbg, we can easily find the strings shown in the terminal output and also, quite immediately, our main program routine. In the image below you can see 4 calls (yes, loading symbols would have made this easier):
- probably a printf asking for user input
- probably a scanf for reading user input
- an unknown function call
- probably a printf for printing the hashed result to the screen
The unknown function call is almost certainly our hashing routine. In this example, the algorithm we are interested in is inside a function, but it could also be directly inlined into the main routine. It really doesn't matter where your executable code comes from.
Here is the disassemble of that unknown function:
00007FF72B331118 | BA C59D1C81              | mov edx,811C9DC5
00007FF72B33111D | EB 0B                    | jmp 7FF72B33112A
00007FF72B33111F | 0FBEC0                   | movsx eax,al
00007FF72B331122 | 33C2                     | xor eax,edx
00007FF72B331124 | 69D0 93010001            | imul edx,eax,1000193
00007FF72B33112A | 8A01                     | mov al,byte ptr ds:[rcx]
00007FF72B33112C | 48:FFC1                  | inc rcx
00007FF72B33112F | 84C0                     | test al,al
00007FF72B331131 | 75 EC                    | jne 7FF72B33111F
00007FF72B331133 | 8BC2                     | mov eax,edx
00007FF72B331135 | C3                       | ret
This is quite a short function that could, in fact, be easily rewritten, but it could also very well be a much more complex routine. As mentioned earlier, for the sake of this demonstration, let's stick with this one.
Before continuing, there are some considerations that need to be made when ripping code from compiled binaries. You must check if there are no other internal calls or access to memory locations outside of the scope your are copying, as those locations will not be mapped and will result in access violation. If you are ripping a function, you should also check the calling convention to avoid stack corruption. Our hashing application is a 64 bit binary, so it uses the Microsoft x64 calling convention. That means that the caller has the responsibility of managing the stack and do the cleanup. It also means that the first four integer arguments are stored in registers RCX, RDX, R8, and R9, in this specific order. Additional arguments are pushed onto the stack and the return value is stored in RAX (or it's 32bit lower segment EAX).
Analyzing the above code, we can see that there are no external calls, so we are OK in that regard. All the jumps are short relative jumps inside the scope of the function. OK there too. There are no additional stack manipulation for argument parsing, so that means that the only argument used by the function is stored in RCX, as seen on address 00007FF72B33112A. Since this function is hashing a string, RCX is probably the pointer to our string, as it's accessing a single byte/char at that address.
Anyway, we are not interested in actually understanding what this function does. We only care for what it returns and that's why we are ripping it. We need to copy of the opcodes of this routine, shown in the second column of the listing above. You can easily copy this into a formatted C/C++/C# byte array by selecting all the lines above in x64dbg, then Right Click -> Binary -> Edit -> Copy Data. The result is the following:
{
0xBA, 0xC5, 0x9D, 0x1C, 0x81, 0xEB, 0x0B, 0x0F, 0xBE, 0xC0, 0x33, 0xC2, 0x69, 0xD0, 0x93, 0x01,
0x00, 0x01, 0x8A, 0x01, 0x48, 0xFF, 0xC1, 0x84, 0xC0, 0x75, 0xEC, 0x8B, 0xC2, 0xC3
};
Using the shellcode in C#
Let's now dig into the most important part of this article: actually using the shellcode in C#. I'm assuming you already have some intermediate knowledge of C#, as I'm not going into too much detail with regards to the language itself. I'll be posting the complete example at the end.
In order to avoid more calling convention issues, let's force our program to only compile to x64 instead of any CPU. We can do this by going into Visual Studio's menu Project -> Project Properties -> Build and set Platform Target to x64.
Now, for the code, let's begin by adding the InteropServices namespace:
using System.Runtime.InteropServices;
We also need two native functions from Windows kernel. So we add those as well using DllImport:
[DllImport("kernel32.dll", SetLastError = true, ExactSpelling = true)]
static extern IntPtr VirtualAlloc(IntPtr lpAddress, uint dwSize, uint flAllocationType, uint flProtect);

[DllImport("kernel32.dll", SetLastError = true, ExactSpelling = true)]
static extern IntPtr VirtualFree(IntPtr lpAddress, uint dwSize, uint dwFreeType);
Now, to actually use the shellcodes we extracted, we will be employing function pointers. In C#, we have function pointers in the form of Delegates. A delegate is basically a prototype function with predetermined arguments and return types. You can map this prototype to any method that matches this signature (and that includes our shell code, although the C# compiler has no idea of it!).
We know that the function takes a pointer to the string being hashed and returns a 32 bit integer (you can see that it's using EAX instead of RAX). In this case though, using RAX and a 64 bit return value wouldn't make a difference. With that information, we can create our Delegate:
delegate UInt32 HashPrototype(byte[] InputText);
The use of byte[] instead of char[] is because the standard C# char is 16-bit Unicode, while our ripped function operates on a standard 8-bit ASCII input, as seen by the mov al,byte ptr ds:[rcx] instruction. We can now declare our shellcode from before in the form of a byte array:
byte[] shellcode = new byte[]
{
    0xBA, 0xC5, 0x9D, 0x1C, 0x81, 0xEB, 0x0B, 0x0F, 0xBE, 0xC0, 0x33, 0xC2, 0x69, 0xD0, 0x93, 0x01,
    0x00, 0x01, 0x8A, 0x01, 0x48, 0xFF, 0xC1, 0x84, 0xC0, 0x75, 0xEC, 0x8B, 0xC2, 0xC3
};
Next, allocate a buffer to hold a fixed pointer to our shellcode. The 0x1000 in the third argument correspond to MEM_COMMIT allocation type, and 0x40 gives read, write and execute permissions to the allocated memory block (PAGE_EXECUTE_READWRITE). The pointer to this buffer will be stored in the variable buffer. The second line simply copies our byte array into that buffer.
IntPtr buffer = VirtualAlloc(IntPtr.Zero, (uint)shellcode.Length, 0x1000, 0x40);
Marshal.Copy(shellcode, 0, buffer, shellcode.Length);
We then map our allocated buffer to our delegate. The .NET Framework provides a very useful marshalling method called GetDelegateForFunctionPointer which takes a pointer to a buffer in memory and casts it to a delegate. It must be noted that the GetDelegateForFunctionPointer method has no idea about the contents of the buffer, so if your delegate prototype doesn't match the functionality of what you are pointing to, you will get a nasty crash. You also won't be able to debug this delegate, since it's tied to native code.
HashPrototype MyHashingFunction = (HashPrototype)Marshal.GetDelegateForFunctionPointer(buffer, typeof(HashPrototype));
I think what we've done this far is pretty remarkable, as we are reaching quite a low level with a managed language such as C#, bypassing what is a very strongly typed environment.
Now all that is left for us to do is to call our delegate like any other standard C# method. For example, we can do:
//We need to convert the string to an 8-bit ASCII array
//Make sure to add the null terminator at the end, otherwise we will overflow
//as there are no boundary checks in the native code  we are using
byte[] stringArray = ASCIIEncoding.ASCII.GetBytes("Fergo\0");

//Call the shellcode through our Delegate, passing the stringArray, which is a pointer
UInt32 hashedResult = MyHashingFunction(stringArray);

//Print the result
Console.WriteLine("Here is hashed result in hex: {0:X8}", hashedResult);
We should also free the allocated memory after we are done using it, otherwise there's a memory leak waiting to happen. The 0x8000 at the last argument corresponds to MEM_RELEASE, which marks the used memory pages as free. When using MEM_RELEASE, the second argument of VirtualFree must be zero.
VirtualFree(buffer, 0, 0x8000);
And here is the resulting output:

As you can see, our hashed output is the same one from the original native program. We successfully ripped the machine code instructions from a native compiled program and reused it in our managed environment, yet we have no idea on the algorithm behind it! I won't be judging the security risks that comes with this technique in this article.
And... that's basically it! In this article we only covered a single and very specific situation of directly using native code with a managed .NET application.
You can also use this technique to assemble your own code from scratch using an assembler or use any other language capable of building native executables. This can be quite useful for performance sensitive code, which can be heavily optimized in assembly and then bypass the performance overhead of CLR JIT (though it's getting incredibly fast now days). Being able to take advantage of SIMD instructions such as SSE and MMX is also a big plus of this method. Vector arithmetic can hugely benefit from this.
Lastly, as mentioned before, some types of algorithms can be quite cumbersome to do in C#, specially the ones that relies heavily on pointer and memory manipulation. With this technique, you can perhaps program your algorithm in C or ASM, compile/assemble it and later use it in the managed environment.
Here is the final code that you can just paste into a Visual Studio C# Console Application. If you don't trust the shellcode, feel free to disassemble it (or compare with the x64dbg image above):
using System;
using System.Runtime.InteropServices;
using System.Text;

namespace Shell {
    class Program {

        [DllImport("kernel32.dll", SetLastError = true, ExactSpelling = true)]
        static extern IntPtr VirtualAlloc(IntPtr lpAddress, uint dwSize, uint flAllocationType, uint flProtect);

        [DllImport("kernel32.dll", SetLastError = true, ExactSpelling = true)]
        static extern IntPtr VirtualFree(IntPtr lpAddress, uint dwSize, uint dwFreeType);

        delegate UInt32 HashPrototype(byte[] InputText);

        static void Main(string[] args) {

            byte[] shellcode = new byte[]
            {
                0xBA, 0xC5, 0x9D, 0x1C, 0x81, 0xEB, 0x0B, 0x0F, 0xBE, 0xC0, 0x33, 0xC2, 0x69, 0xD0, 0x93, 0x01,
                0x00, 0x01, 0x8A, 0x01, 0x48, 0xFF, 0xC1, 0x84, 0xC0, 0x75, 0xEC, 0x8B, 0xC2, 0xC3
            };

            IntPtr buffer = VirtualAlloc(IntPtr.Zero, (uint)shellcode.Length, 0x1000, 0x40);
            Marshal.Copy(shellcode, 0, buffer, shellcode.Length);
            HashPrototype MyHashingFunction = (HashPrototype)Marshal.GetDelegateForFunctionPointer(buffer, typeof(HashPrototype));

            byte[] stringArray = ASCIIEncoding.ASCII.GetBytes("Fergo\0");
            UInt32 hashedResult = MyHashingFunction(stringArray);

            VirtualFree(buffer, 0, 0x8000);

            Console.WriteLine("Here is hashed result in hex: {0:X8}", hashedResult);

            Console.ReadLine();
        }
    }
}
One last recommendation: try to stick to Microsoft x64 calling convention and x64 machine code. Mixing x86 and x64 with different calling conventions, although possible, can cause quite the headache and it's a pain to debug.
I'm also not sure how this works with Mono on Linux.
Hope you enjoyed this article. Feel free to comment!